Are you looking to install your wired Nest Doorbell to an existing chime? You can simply install your new doorbell with the existing wiring you already have in place. The process is relatively easy if you know what to do.
Below is an easy-to-follow guide on using the Nest Doorbell installation diagram to install your new doorbell to the old chime.
- Google Nest Doorbell Installation Diagram
- 1. Gather the Necessary Tools and Materials
- 2. Turn Off Power
- 3. Remove the Old Doorbell
- 4. Install Your Chime Connector
- 5. Prepare the Doorbell Mount
- 6. Attach the Wiring to the Doorbell
- 7. Attach the Nest Doorbell
- 8. Power on the Doorbell
- 9. Set up the Nest Doorbell in the App
- 10. Configure Settings
- 11. Test the Doorbell
- 12. Secure the Nest Doorbell
- Does Google Nest Doorbell Need to Be Hardwired?
- Does Nest Doorbell Require a Transformer?
- Can You Wire a Nest Doorbell Straight to a Transformer?
- What Size Transformer Is Needed for Nest Doorbell?
- How Many Volts Does the Nest Wired Doorbell Need?
- Does It Matter Which Wire Goes to Which Doorbell Transformer?
- How Do I Know if My Nest Doorbell Is Getting Power?
- Why Is My Wired Nest Doorbell Not Working?
- Do You Need an Electrician to Install a Nest Doorbell?
- Summary
- Sources
You may also like:
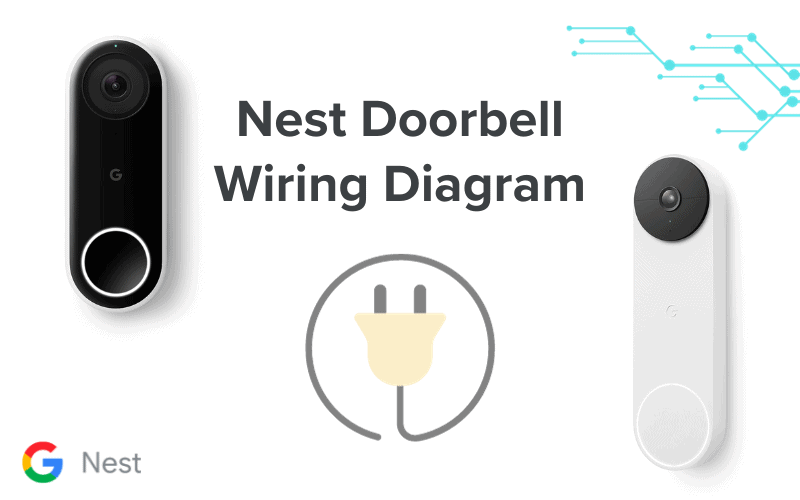
Google Nest Doorbell Installation Diagram
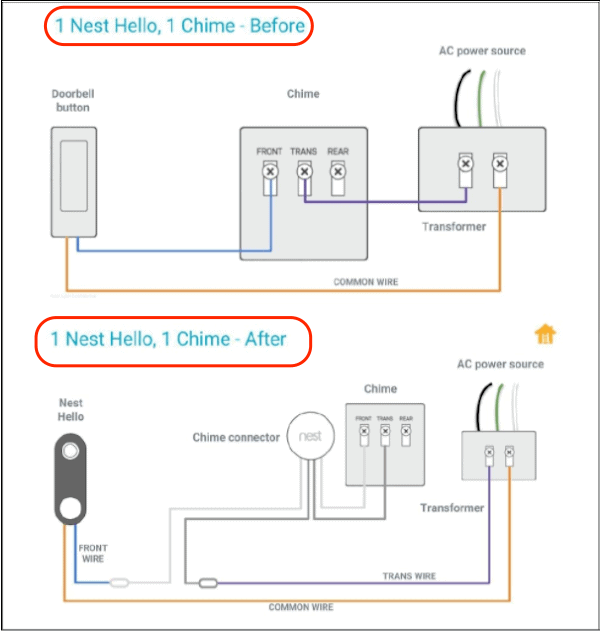
To connect your Nest Doorbell to an already-existing chime, you would need a Nest Chime Connector. This device links your doorbell and electricity by delivering constant power to your doorbell. The diagram above shows how to make the connection.
Pro Tip: Before connecting your Nest Doorbell to already existing wiring, you’d want to verify that your current doorbell wiring is comparable. Use the Nest Compatibility Checker to do so.
We recommend that you get the services of a Nest Pro to help with the installation. If you are looking to carry out the installation of your Nest Doorbell yourself, though, here is a comprehensive guide to follow:
1. Gather the Necessary Tools and Materials
Start by getting all the materials and equipment you need ready:
- Google Nest Doorbell
- Pencil
- Screwdriver
- Drill (if needed)
- Anchors and screws (if needed)
- Chime connector (if needed)
- Smartphone or tablet with the Google Home app installed
- Wi-Fi network with a strong signal near the installation location
2. Turn Off Power
If replacing an old doorbell with a new one, turn off the power to your existing doorbell at the circuit breaker or fuse box. You never want to tamper with electricity and put yourself at risk of an electrical hazard. It’s not worth the risk at all.
3. Remove the Old Doorbell
If you have an existing doorbell, remove it from the wall to make room for the new one.
Depending on the old doorbell you’re using, the steps you’d have to take to remove the old doorbell would vary.
Typically, the steps involved would include removing the old doorbell’s outer housing, disconnecting the connecting wires (for wired doorbells), detaching the rest of the doorbell from its mount, and removing the mount itself.
Pro Tip: After removing the old doorbell, tape the wires to the wall to avoid them slipping into the wall.
4. Install Your Chime Connector
Once you’ve removed the old doorbell, you’d want to start installing your new Nest Doorbell. To do this, you’d start with installing the chime connector that comes with your new doorbell.
Installing your chime connector is essential to help make sure your doorbell works properly and doesn’t get damaged.
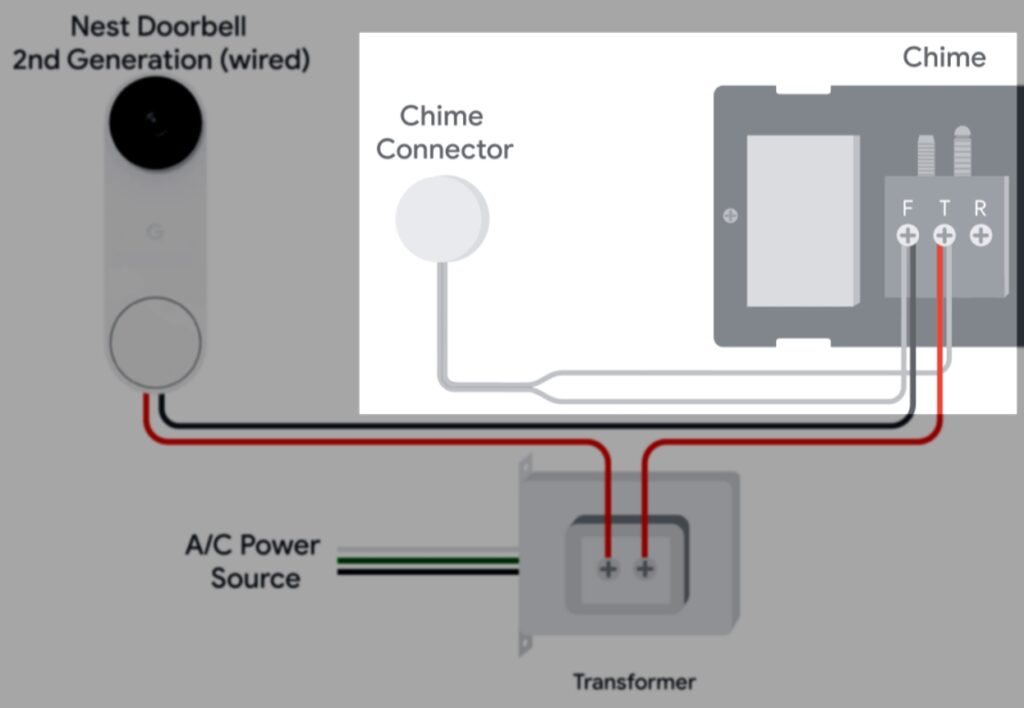
You should install the chime connector right on your chime following the illustration of the diagram right above or at the beginning of the article, depending on if you have the Nest Doorbell 2nd Gen or the previous Nest Hello Doorbell.
Pro Tip: Taking a picture of the chime’s wiring before you begin installing the chime connector might help provide a good reference point when using the wiring diagram.
If an old chime connector is already installed, remove it and install the one that came with your Nest Doorbell.
When connecting your chime connector to your chime, pay attention to the labels on your chime connector and in the diagram above. Connect the wires appropriately, and you’ll connect the chime connector to the chime without much hassle.
Once you’ve successfully connected the chime connector to the chime, attach the connector close to the chime, but not touching any moving parts. You could even attach it to the chime cover, ensuring you remove the adhesive cover at the base of the chime for a firm attachment.
5. Prepare the Doorbell Mount
Now, it’s time to start preparing to mount the Nest Doorbell.
Start by first choosing a suitable position for the doorbell. With the Nest Doorbell being a video doorbell, you’d prefer a position where the camera would have the best view of visitors and individuals in front of your door.
Once you have the perfect position, you’d want to use a pencil to mark where your doorbell would be installed. You’d also want to use a ruler or a level to ensure the doorbell is installed straight.
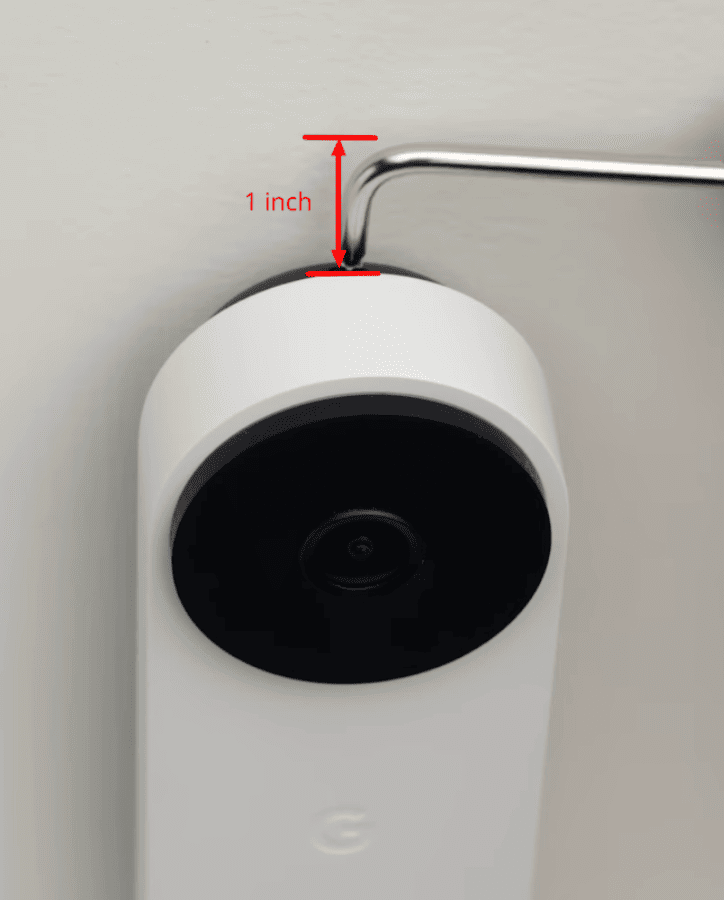
Pro Tip: Choose a position with some space above the doorbell.
You need at least 1 inch (2.5 cm) for the minimum space required to use the hex key when securing your doorbell to the base plate if you have a wired 2nd gen Nest Doorbell. On the other hand, you’ll need a 2.25-inch (5.5 cm) space if you have a doorbell that uses a release tool.
Once you have chosen the perfect position, it’s time to mount your base plate. (If you want your doorbell installed at an angle for better coverage, you’d like to use the wedge that comes with the doorbell and then attach the mount to that).
Now it’s time to attach the provided mounting bracket (or wedge) to the wall or door frame using the included screws and anchors.
If you need to drill holes into the wall, mark the position of the holes where the screws are supposed to go on the mounting bracket or wedge. Make sure to position the hole for the doorbell wiring close to the lower part of the largest hole in the center of the mount.
Once this is done and you’ve drilled the hole into the wall, screw the mount/wedge into place.
6. Attach the Wiring to the Doorbell
Connect the wires from your home and the chime connector to the Nest Doorbell, as seen in the diagram above.
Typically, you’ll have wires for power (usually labeled “Front” or “Transformer”) and a wire for the chime. Follow the wiring diagram provided above.
7. Attach the Nest Doorbell
Once you’ve connected the wires to the doorbell, slide the Nest Doorbell onto the mounting bracket and secure it in place.
8. Power on the Doorbell
Turn the power back on at the circuit breaker or fuse box.
9. Set up the Nest Doorbell in the App
- Open the Google Home or Nest app (depending on your device model) on your smartphone or tablet.
- Tap the “+” icon to add a device.
- Follow the on-screen instructions to set up your Nest Doorbell and connect it to your Wi-Fi network.
10. Configure Settings
Once you have set up the doorbell on your app, start configuring your settings for a better experience. Customize your Nest Doorbell settings, including motion detection, alerts, and notifications, using the Google Home app.
11. Test the Doorbell
Once configured, test the doorbell to ensure it’s working correctly. You should receive notifications on your mobile device when someone rings the doorbell, and you should be able to see and communicate with visitors through the app.
12. Secure the Nest Doorbell
Once you’re satisfied with your configuration, ensure the Nest Doorbell is securely mounted and adequately sealed against the elements.
Does Google Nest Doorbell Need to Be Hardwired?
It all depends on the model of doorbell you own.
If you own a wired Nest Doorbell, you’d need to hardwire your doorbell. If you have a battery model, however, your doorbell doesn’t need to be hardwired.
However, while battery models of Nest Doorbells don’t need hardwiring to work, you can still hardwire them if you want to. Doing this gives your device a trickling electrical charge to keep the batteries charged in use.
Does Nest Doorbell Require a Transformer?
Typically, only wired Nest Doorbells require a transformer. But this is only the case if your home’s wiring doesn’t meet the doorbell’s energy requirement.
To function properly, Nest Doorbells require between 16-24 V AC and 10-40 VA. If your home’s electrical supply falls within this range, there is no need for a transformer. If not, however, then you would need a transformer that meets those requirements.
Can You Wire a Nest Doorbell Straight to a Transformer?
Yes, you can connect a Nest Doorbell straight to a transformer as long as the transformer meets the power requirements of the doorbell. You could also decide to connect the doorbell first to a chime, then to the transformer, if that’s something you would be interested in.
What Size Transformer Is Needed for Nest Doorbell?
You need a transformer rated for 16-24 V AC, 10-40 VA.
How Many Volts Does the Nest Wired Doorbell Need?
Your Nest doorbell needs between 16-24 volts.
Does It Matter Which Wire Goes to Which Doorbell Transformer?
Generally, no, it doesn’t matter which wire goes into which side of the transformer.
How Do I Know if My Nest Doorbell Is Getting Power?
Every Nest Doorbell has two lights designed to indicate the status of the device: the LED status light located close to the camera and the large ring of light around the doorbell button.
Pay attention to the LED indicator to know if your doorbell receives enough power. If the light is a solid green, then everything should work smoothly.
However, if the light is blinking yellow, that’s a sign that your doorbell doesn’t have enough power.
Why Is My Wired Nest Doorbell Not Working?
Your wired Nest Doorbell might not work for several different reasons.
It could be because the device isn’t connected to a suitable transformer, the internal battery of the device is no longer capable of holding enough charge, or some other reason.
Contact a Nest Pro to find out why your doorbell isn’t working as it should.
Do You Need an Electrician to Install a Nest Doorbell?
Not necessarily; that being said, the more complicated the electrical wiring of your old doorbell, the more you should consider getting the services of an electrician.
Summary
Installing a Google Nest Doorbell to an existing chime can be straightforward when you follow the provided wiring diagram and instructions. However, it’s essential to carefully follow the instructions in the diagram to get the job done right.
Remember that whether your Nest Doorbell needs to be hardwired or requires a transformer depends on the specific model and your home’s wiring.
Always check the device’s power requirements and consult a Nest Pro or an electrician if you’re uncertain about the installation.
Once your Nest Doorbell is installed, you can begin to enjoy the convenience and security it provides. Be sure to configure your settings in the Google Home app or Nest app (depending on the model), and test the doorbell to ensure it’s functioning correctly before you consider your installation complete. If you ever encounter any issues, get in touch with a Nest Pro right away.
Check out Nest Indoor Camera 1st Gen vs. 2nd Gen and Nest Doorbell Problems for more related content.
Sources
- Install Nest Doorbell (wired, 2nd gen), Google Nest Help
- Check Nest doorbell compatibility, Google Nest Help
- Nest Doorbell Compatibility Checker, Google Store
- How to Set Up and Install Your Google Nest Doorbell (Wired), Made by Google YouTube
About Author
I'm Maroun, the seasoned technology writer crafting compelling tutorials and posts since 2013. With over a decade of versatile experience spanning the IT, Security, and High-tech industries, my main qualities are adaptability and perfectionism. Join me in this journey, where every word is a masterpiece!
Read more about Maroun